Search This Blog

Showing posts with label Hacking. Show all posts

How to use programs in Fullscreen mode in Windows7 and higher OS?

Dec 20, 2013
For this post, we take the reference of Borland C as our desired computer program.

Borland C was originally a program developed for 16-bit computers. Today's modern computers generally come in 32-bit or 64-bit architecture. While older operating systems(OS) like Windows XP supports running of old applications freely in full screen mode, the newer versions of OS like Windows 7 and higher DO NOT support full screen by default.

For most programs, it is possible to change compatibility by right-clicking the application, selecting 'properties' and using 'window mode' instead of 'fullscreen'. But that is only a temporary solution. In programs such as Borland C, that is possible but NOT FEASIBLE because it certainly opens the program but you wont be able to RUN it. (i.e The black screen output wont appear)

The ultimate solution to this and many more older programs that are based on a 16-bit architecture is the use of DOSbox. DOSbox is a revolutionary program that can partially emulate an older computer. In simple words, DOSbox creates a 'older computer' inside your computer. In that mode, the program will work just as good as it would work on a 16-bit system. It is fully compatible.


Download links:

[Mirror]: DOSbox (official file mirrored)


[Mirror]: Borland C (mirror: original file)


How to use DOSbox?
After you install DOSbox, an icon like this will appear on your desktop.
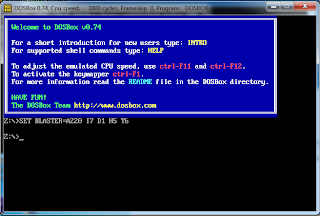
Just click on that and a DOS based console like the one shown below will appear!


Here, [Z-drive] is the virtual drive that represents the 'old computer' created by DOSbox. It has limited resources, which can be adjusted if you desire.

To use any program, you must first MOUNT it in DOSbox.

Basically, mounting means creating another virtual drive. DOSbox has only one virtual drive [Z-drive] at the begining. For DOSbox, there is no C-drive, D-drive or any other drive in your computer.

How to Mount?
 
If your program is in this location:  D:\BorlandC\bin\bc.exe  
then you should first mount D-drive.

To do this, type  Mount d d:\  in DOSbox and hit Enter key!
Then, you should get a message after this.


The command   Mount d d:\  will create a virtual D-drive and load the path D:\ inside it. That means the virtual D-drive will also have everything inside D:\ (which is the original D drive)   

You can change  to any other letter to change virtual drive letter.
 d:\  is a path and it MUST exist in your computer. Since my program is stored in D:\BorlandC , I chose D:\ as my path. You can choose a different path for your computer.          

Now to open that program, first go to the virtual drive you just created.
I created 
d:  so I simply type d: and hit Enter-key
After you hit enter, you will enter that drive. Look I just entered D-drive. Previously I was at Z-drive.

To open the program, simply type its path.
For me that is, D:\BorlandC\bin\bc.exe 


Now as you hit ENTER-key, your program will open.
You can use it in Fullscreen mode by using the key combination  Alt + Enter   

Borland C opens like this (In its default mode), 


you can start using it by using the key combination  Alt + F + N  which opens a new file to start working with!

It should look like this:


+This part of the article is added because a friend of mine pointed out something really interesting.
 

He asked:  Do I need to give the source path Every time " .

The answer is Yes if you follow this method. But after you get acquainted(familiar) with this method, you can try a simple trick to make this happen automatically. It is a simple batch processing trick that commands DOSbox to perform a series of actions.

To automate this Process for future use, refer to the follow-up post here!

Any Queries? Any Confusion? Need help?Feedback?
Just Drop a Comment!

Read more ...

Facebook Trick : How to Easily invite ALL friends in a event? or to Like your Page?

Aug 19, 2013


Let's learn this one practically. If you can follow the steps below, you can definitely do this for your own page. Okay then follow the instructions below, 

and 

click on the images below to enlarge them!


Instruction1:

Go to this page & like it : https://www.facebook.com/no2uniform

Then click on the "See All" link in invites tab.


Instruction2:

Click on "Recent Interactions" and mark on " Select All Friends" in dropdown category.

Keep scrolling down until you have the passed by the name of every single one of your friends.

Now, if you are using 
Google Chrome
 or its variant (Like Torch Browser):
Press Ctrl + Shift+J

If u r using 
Firefox:
Press Ctrl+ Shift+K

A console window should open . See next image.


Instruction3:

Click on "Console" tab in your opened window.


Instruction4:

Paste the code below in console & hit enter!

javascript:elms=document.getElementsByName("checkableitems[]");for (i=0;i<elms.length;i++){if (elms[i].type="checkbox" )elms[i].click()};


Instruction5:

After some time, you can see that all your friends have been selected!

Now close the console window only.


Instruction6:

After closing console window, click on "Submit" button


Instruction7:

You should get this message after following all steps. If not, please try all these steps with Mozilla Firefox or Google Chrome, or Torch Browser. 


COMMENTS:
Read more ...

Easiest way to Take Ownership of a File in Windows.

Aug 14, 2013
Taking ownership of system files or folders in Windows 7 or Vista is not a simple task. Whether you use the GUI or the command line, it takes far too many steps. 

Thankfully somebody created a registry hack that will give you a menu item for “Take Ownership” that will handle all the steps for you. (If you are the person that originally made this script, let me know and I’ll give you credit) 

Here’s what the new right-click menu will look like after installing this registry hack.


Install Feature:
Download and unzip the files contained in the zip file. Double-click the InstallTakeOwnership.reg file and click through the prompts. No reboot necessary.

Uninstall Feature:
Double-click the RemoveTakeOwnership.reg file and click through the prompts. No reboot necessary.

CLICK HERE TO DOWNLOAD TAKEOWNERSHIP.ZIP FILE

Why should you know how to take ownership of a file?
Well first and foremost, its because you own the OS that you use and you should be able to handle/modify all tasks in your OS. Wouldn't you agree?
Second reason is, sometimes some files will refuse to budge/modify or even read when you really need it. That's because those files are generally protected by the highest level of authority in the computer. So, if you wanted to edit a few components ina file to make youtube load faster, or maybe increase the speed of the internet you are using via a simple trick , then you would have problems if you do not have access to the files you want to manipulate.


Any more questions/queries? Please comment

COMMENTS:

Read more ...

GADMEI USB 2.0 TV BOX - Software + Driver for Windows XP / Windows Vista / Windows 7

Jul 28, 2013
 This is a tested & working fix for GADMEI UTV332E / UTV330E 


 GADMEI USB 2.0 TV BOX  users will have to agree that the GADMEI software installation really sucks big time, with a capital S. This is because the whole device is made in China and its drivers and software are rendered 'untrusted' by Windows due to non standard certificates. [Even though they work perfectly under optimal fixes.]


The saddest part is, that it is not entirely based on an english language interface either, so most people will NOT get the much needed 'help'. The help & support at GADMEI sucks big time too! So, we GADMEI user folks had to develop our own way to overcome this problem.

I'm sure users have had problems installing the TV BOX in Windows 7 OS platform. It is fairly simple with Windows XP and Vista, but sometimes, it won't work too!

So to sum it up, thats why  GLP  brings you a nifty trick to overcome this problem.

NO big bulky downloads, NO useless files. 
Just a nifty trick, some very small size file downloads and we're good to go!


 NO [.exe] files either, so you don't risk a malware or virus [Its tested] 


 Follow this easy set of instructions: 

  1. First download these files, if you DO NOT already have them.

  2. Extract the files from  USB TV BOX 3.0[GLP].zip , and install GADMEI USB BOX 3.0 software (Yes it says 3.0, but the device is actually 2.0, it supports both). Install by running  autorun.exe  inside the extracted folder.

  3. If you run Windows XP, restarting the system will work fine after install. Same for Vista. Thats all for XP & Vista.

  4. If you are running Windows 7, do not restart yet!

  5. Extract  Win7Drivers[GLP].zip  and paste the files inside the same folder where you installed the TV box software in Step 2.
     example: If you installed in E:\Gadmei , paste it inside that folder. 

  6. Now go to Control Panel > Administrative Tools > Computer Management > Device Manager > Select the 'USB TV DEVICE' with a question mark sign.

  7. Right click on it & select 'Update Driver Software' > Browse my computer for driver software > 'Browse' and select the place where you pasted all the  drivers extracted in Step 5.   In my case, E:\Gadmei 

  8. Okay then, thats it! Congratulations, you have succeeded in fixing your 'wittle' GADMEI problem in Windows 7.

 Do share and spread this to let more people know & help them! 
Bookmark us to solve your problems for FREE,

lose your problems at GLP. 
Still confused? Catch the simplified version of this trick, click here! 

COMMENTS:

Read more ...

Adobe Photoshop CS3 Portable - NO INSTALL REQUIRED

Jul 15, 2013
Adobe Photoshop CS3 Portable - NO INSTALL REQUIRED is an ideal Photoshop for users who love to edit pictures but have low RAM. This version of photoshop can work with just 512MB or (0.5Gb) RAM. It also supports 32-bit system (32bit or x86 type). It can run directly from the Flashdrive (Removable Storage or Pendrive ).

[Verified internal download, with private hosting.]
>> DOWNLOAD ADOBE PS CS3 PORTABLE by clicking HERE <<

Other Internal Links:

Mirror: >Link1<  >Link2<  >Link3<


[External Mirrors] (not recommended)
If the above download does not work for you, u can also try these alternative downloads
Mirror1: Download by clicking here!
Mirror2: Download by Clicking here!


No Installation is required and loading time is similar to installed version. It is very light weight and portable too, so It is a handy tool. This version is preactivated without cracks and totally FREE too. No registration required. It is packed with lots of powerful and handy features. All these features come in a small package of only [48.1MB]. It is indeed a golden find! You should Download it immediately! 


COMMENTS:


Read more ...

How hackers work? #Method2 -- Scams!

Jul 12, 2013
<<Catch How Hackers work? #Method1--Doxing by clicking here

In the era of Internet, emails and social networking have taken a prominent role in almost everyone’s life, especially when it comes to the exchange of information and personal messages. So, hacking the password of an email or social networking account alone can reveal a lot of personal details about the person. Even though hacking is considered illegal, some people are left with no other option. This can be a parent wanting to gain access to the child’s email or someone who need the password of their partner’s social media account.
Well, this post is not about teaching you how to hack! But, it is about making you aware of some of the password hacking scams and fake hacking tutorials that are waiting to exploit those people who are in desperate need of hacking someone’s online password. Here is a list of some of the online scams that you should be aware of and always stay away from:

1. Password Hacking Services:

Many of the scam websites have managed to rank on top of Google for some of the most popular keywords about hacking. As a result, these websites attract a lot of people (who are in need of someone’s password) and promise them to give what they want! As most people do not have any knowledge about hacking, they often believe what is mentioned on these websites is true. Taking this factor as an added advantage, these websites (the so called hacking services) rip off money from the people and never keep up their promise.

Why password hacking services do not work?

The big reason behind why these services never work is that, most of them are owned by those scammers and noob hackers who do not have sound knowledge of how the hacking process actually works. Also, with the level of security adopted by the services like Gmail, Yahoo or Facebook, it is near impossible to to hack their database to obtain the password. Unlike, what is mentioned on most of these websites, it is not possible to use the brute force approach as well. Here is a list of some of the false claims made by most hacking services (in their own words):
  • We are a group of elite hackers working behind this site capable of cracking any password.
  • We have found out a certain vulnerability in the Facebook or Gmail servers using which we crack the password.
  • We use brute force approach to crack the password.
  • After a long time of research and hard work, we have managed to develop a program that can crack any password with just a click of a button.
If you come across a site making claims as mentioned above, it is a clear sign of a scam service. To identify them more clearly, here is a list of additional signs that you can look for:
So, the bottom line is that, if you come across a website that seems too good to be true or show some signs as mentioned above, it is always a better choice to stay away from them.

2. Fake Hacking Tutorials:

This is another type of scam that most teenagers fall victim for. This is because, most teenagers do not have enough money to afford the hacking services and hence go in search of free options and hacking tutorials that can easily get them the password they want. This is where the fake hacking tutorials come into play.
This tutorial is designed cleverly to trick users and make them believe it is true. But, in reality, when someone follows the method prescribed in the tutorial, they lose their own password in attempt to hack someone else’s password. Here is a small example of how this fake tutorial goes:

Here is an easy way to hack any Gmail password. This method was revealed by a professional hacker to me which when tried was successful.
  1. Log in to your Gmail account and compose a new email.
  2. In the subject, type exactly as follows: “password retrieval”.
  3. In the body of the email, type your username followed by your password in the first line.
  4. Leave exactly 3 lines of gap and type in the target username that you want to hack. Then send this email to: passretrieve2013@gmail.com.
When you do this, the Gmail server gets confused and will send the target password to your inbox within the next few hours.

Now, let us carefully look at how the above trick works. This trick is designed intelligently by a noob hacker and is often posted on many forums and low quality websites. Here, the creator of this tutorial tells a lie to the people that there exists a bug in the Gmail system that can be exploited by using the tutorial. However, by following this trick, innocent victims are sending their own password to the hacker’s email address (passretrieve2013@gmail.com) and thus get trapped.
This is another type of scam that seems too good to be true. Unfortunately, most people would follow this trick and end up handing over their login details to an unknown person. If you’ve ever tried this method, it is a wise option to change your password immediately in order to prevent any further damage.

I hope you like this post. Please pass your comments.

<<Catch How Hackers work? #Method1-- Doxing by clicking here


COMMENTS:

Read more ...

How to Recover Data on Your External HDD ( Hard Disk Drive ) - ADATA CH94

Jul 8, 2013


Get paid to share your links!
Hello folks! Today I am going to teach you how to fix your External HDD yourself ! This post will mostly talk about ADATA CH94 External HDD only because I own it myself.  You can still follow the same steps for other External HDD.

Before you start, please remember that this is my own solution to the problem by detecting the MOST COMMON flaw in most EXTERNAL HDD models. I am not liable for any harm to your HDD that you may cause because you were too lazy &  DID NOT READ THIS PROPERLY!
Where we begin?
We begin by addressing the most common problem in External HDD's ; that is -- loose connections. External HDDs are really just internal HDDs with a write head attached to them. It is portable and all, but by all means, it is just similar to Hard-Disk that you use inside your computer. You could even remove the write-head manually and create an Internal Hard Disk Drive!


If you tear off the warranty seal, and open the compartment of an ADATA-CH94 External HDD, you will see a TOSHIBA Internal HDD with an attached Write-head.
{ Click on the thumb-nails to get a Clear Enlarged Picture // Click on the pics below }

Step1:
Tear off your warranty seal as shown in figure1.
*Warning! Tearing your Warranty Seal will void your warranty. If your warranty still covers your hard-disk, don't try this method at all! If your warranty period is over or, If you are from Asia, and not getting over 1 year warranty, you can try this.

Step2:
Open the Hard-disk casing carefully. You will see a Toshiba HDD2J53 hard-disk inside, with a mounted write-head. Remove the whole thing carefully from the outer plastic cover.


Step3:
Carefully Separate the Write-head and the main Hard-disk. DO NOT try to force it apart roughly. You should wiggle both sides to the write-head little by little to remove it gently! Once removed, operate carefully because the right-head is just a simple circuit. A lot of pressure will break it or, damage connections.


Where's the problem?
[The Problem Lies in this Step - Step3]
The problem with MOST External HDD is that the Plastic casing is usually flat and not top-mounted. Due to this, the connections between the Write-head and the main HDD loosens over time due to jerking, motion, falling, accidents with the External HDD.


The Solution? The Solution is simple, if something loosens, you just secure the connection by making it tight. You can notice that there is already a metallic tape wound over the hard-disk. Do not remove it. In fact, first make a secure connection with your HDD and write head by rejoining them.


Step4:
Carefully, rejoin the write-head and the HDD. Make sure that it's a secure connection. Now, connect it with the USB cable and test it without the cover (just like a beta test). If the connection is secure, you will see that the error message saying that YOU NEED TO FORMAT YOUR DISK, no longer appears! Instead, the data will be read like nothing ever happened to your External Hard-disk.
[Note: If you have accidentally formatted before, just to get rid of this message, then the Hard-disk will not yetstart to work normally. You will need to RECOVER the lost data first. DO NOT PUT ANY NEW DATA IN YOUR HARD-DISK AT THIS STATE, ALSO AVOID FORMATTING AGAIN!

Step5:
Following upto Step4 has been successful for recovering access to lost data by removing the annoying "FORMAT THIS DISK" message.
Those whose HDD were fixed at this point, can carefully re-cover their HDD and use it as normal. Avoid jerking it too much though... or u will have to do this all over again. If you have already formatted earlier, you need to follow further steps. 

Step6:
If you have access to your hard-disk by following all steps until Step5, but you can still not see any folders/files that you used to have, then your next task will be to RECOVER the data. At this point, don't add a single file/folder/data to your HDD, or the recovery may show lots of error.
*Note: When the HDD and write-head connection loosens, you wont even get access inside your HDD. A message will just pop-up saying that you need to format your disk before using it! If you are still experincing this message, you are doing something really wrong in Step1 to Step4. redo it again.

Step7:
Follow this step ONLY IF you can get inside your HDD drive, but you cannot see any files that used to be there. If you can't access your hard-drive, redo Step1 to 4. If you still can't there must be something wrong with your write-head. Don't throw your HDD yet, you can still use it as an Internal HDD, or repair your write-head.

Okay, if you still have access to your Drive but lost all files, you need to refer to this recovery method. It is very simple an easy with a powerful Recovery tool that would cost you $$... but ofcourse it is 100% FREE here haha!
*Before continuing, I must tell you that the link below will open in a new tab. Please DO NOT close this tab, if you are repairing your HDD. If you are just RECOVERING it, feel free to close this tab once the next tab opens.

>> CLICK HERE TO LEARN HOW TO RECOVER DATA ON FORMATTED EXTERNAL HARD DRIVE <<


COMMENTS:


Read more ...

Facebook Scam

Jul 7, 2013
Notice!!!

A spam post stating "Find Out H0w Much Your Lover L0ves Y0u" is going viral these days. If someone clicks on the link associated with the post, then it automatically gets spreaded in all of his/her Facebook groups. Therefore, DO NOT CLICK on any such links.


Take action to protect yourself and your computer. Monitor your family's use of the internet, Use strong passwords, Always use secure sites. Think before you Click, Share, Post and Comment. Always remember, Smarter Online = Safer Online.

‎#Share this for public awareness.

Get paid to share your links!

COMMENTS:


Read more ...

Apple Quicktime 7.7.4 for Windows PC + Serial Keys

Jul 6, 2013

Hello Guys, I wont waste too much of your time with details, So I am telling you a way of getting Apple Quicktime 7.7.4 for Windows PC  for Absolutely FREE.

Step1: Get the Official Download
>> Click here to get the Official Download <<
*Note: Official Downloads are ORIGINAL copies and Virus-Free. So it is 100% safe! Enjoy!

Step2: Install, then open Quicktime Player, go to "EDIT",...just beside "Files". Click on it and select "Preferences" and "Register". Fill the registration form by following step3.

Step3: Use any of these serial keys (name and serial combinations). I am sorting them according to relevancy. **I used the first one & it worked!

Name: ASHRAF PZR
Registration Code: Q9YB-VLL9-BK29-YGB6-AW4B

Other Keys/Serials:

QUICK TIME PRO 7.7.3 SERIAL KEY

  • Name : www.cracksurl.blogspot.com
    Registration Code: KSM7-ESEG-JF4B-JCN9-RWN4
  • Name :cracksurl.blogspot.com
    Registration Code :XUWK-CMVF-LD7L-CMP5-EKQX
  • Name :cracksurl
    Registration Code :Z7WN-45AP-BMTW-NTMC-6PBL
  • Name :AVTPZR
    Registration Code :6W6R-DSPA-UVBX-P5CG-V7VM
  • Name :FILEHIPPO
    Registration Code :ZUCM-D5B6-DSMM-8JLJ-BFT9


Why Quicktime?
Quicktime is very handy tool for many people. Apple users find it close to home haha. But there is more than just convenience. Quicktime has amazing compatibility. It integrates seamlessly with dozens of applications. It is also very useful for Video/Audio Editors. If you use Adobe After Effects, you should know!

Hope you enjoyed this release!
Keep following and tell us what you need!


COMMENTS:


Read more ...

How to bypass minimum system requirements?

Jun 15, 2013

The problem is REALLY not as difficult as it sounds. You just have to know how to fix it.

Have you ever faced a problem scenario where you have 1Gb RAM ans your software needs 2Gb RAM? You've downloaded it (the software) but you can't install it anymore, because there are error messages like:
  • Your hardware specifications don't match
  • This computer has insufficient RAM
  • This computer does not support this software
  • Installation error, cannot install
You have had this problem before, haven't you? Do you know why they arise? These are warning messages that pop-up when ever the detected specification does not match. It does not necessarily mean that the software would not have worked in your computer. So how do you bypass it?

Bypassing annoying error message pop-ups!

As complex a program is, it is ultimately made by humans. So they are not 100% free from errors. Sometimes even when the specifications match, an unexpected error message shows up - "Installation will abort", "Cannot open this file", "Cannot download patch" are common examples. It could mean that your installation is corrupt or your [.msi] file has some error while checking system. 
You can bypass it easily with a tool called "ORCA"

What is ORCA?

Orca MSI Editor allows you to edit the properties of any MSI file. With this tool, you can change the title and text within the installer an look at how and where the files are delivered. 
Orca.exe was a executable tool found in earlier versions of windows. It was created to bypass these problems. Unfortunately they removed it for the current versions of windows. But you can still find it if you want to download.

Downloading ORCA:


[Download ORCA by clicking here!!
*no survey! *just 30 second waiting time

Image Screenshot: Follow this instruction if you have problems!


Image - Instruction to Download file!


Alternate Download:
Download Link here!! 

*small survey here! *Invalid for Asian Users

Orca: This tool used to be a part of Microsoft Developer Tools but is now retired and no longer supported by the company. Use it at your own risk


COMMENTS:

Read more ...

How to Know if Someone Accessed My Computer When I am Away?

May 31, 2013
Do you have a feeling that someone tried to access your computer when you stepped out for a lunch or quick coffee break? Perhaps your colleague or the person sitting in the next desk tried to log in or play something wicked on your computer while you were away for a quick session.
So, how do you know if someone tried to access your computer in your absence? Well, here is a way by which you get notified every time when such an attempt is made.


The website called MouseLock.co gives a solution here. All you have to do is visit the site’s homepage, sign in to your Gmail account and select your secret point (unlock code) from the screen. Once you do this, you will have to place your mouse cursor into the slot shown and click on it. This will activate the mouse lock feature on your computer screen.


So, when an unauthorized person tries to move the mouse in your absence, he will be given just a few seconds to select the unlock code. Upon failure to do so, you will get an instant notification about the intrusion in your mailbox.


If you have a webcam attached to your computer, you can even get the photo of the person trying to intrude. This will make it easy for you to figure out who actually was the person.
As this is an easy to use web application, you can use it any time just by loading the MouseLock website without the need to install anything on your computer. Even though MouseLock does not manage to prevent the intrusion, it will give you an instant notification about it, so that you aware of what is happening at your desk when you are away.

How it Works?

MouseLock operates by using the “mouseLeaveEvent” from JQuery to track the mouse movements. On the other hand, it uses the “getUserMedia()” API that is supported by Chrome and Firefox to capture the webcam photographs.


COMMENTS:

Read more ...

How to get AVAST INTERNET SECURITY 8 for FREE upto 2050!!!

May 30, 2013

In this post, we are going to learn How to get AVAST INTERNET SECURITY 8 for FREE upto 2050!!!
It is not a crack/patch work completely. Instead it follows a clean method by patching some portion of the original AVAST INTERNET SECURITY 8.

Why AVAST INTERNET SECURITY 8 ?
According to cnet downloads, AVAST INTERNET SECURITY 8 is currently ranked #1 in Internet Security Software Suites. It makes it one of the most formidable and powerful antivirus software. Plus it runs both on the basis of virus-definition & online user statistics i.e Once a new virus is found somewhere in the world by an AVAST ANTIVIRUS, it sends it to the command center HQ and the information about that virus is immediately assimilated to all AVAST's all over the world. So it has a virtual immunity system of sorts!

Overall Protection: Avast Internet Security 8 is a complete antivirus solution


User-Friendly : AVAST has a smartphone like interface as its console.


More than just an antivirus: It has many facilities like Software Updater, Browser Cleanup & Add-on management, Browser restore ; So that you don't have to rely on insecure 3rd party applications!


Okay! This is the part you have been waiting for......

HOW TO GET AVAST INTERNET SECURITY 8 FOR FREE!!

I will skip the explaining on how it works and basically tell you the process step by step.
[If you want details comment below] . Okay Here Goes,....
.
Step 1. First Download all the files that will be listed below and we can start off.
.
Download List:
>>Download Setup<< (Secure: Google Drive Internal Link)
>>Download original License file until 26/09/2013<< (Secure: Google Drive Internal Link)
>>Download License Faker until 2050<< (Secure: Google Drive Internal Link)
[A Secure high speed Dropbox link is being Uploaded or these files.  Links will be here soon]

If the above download Links don't work for you. Please try these alternatives:
>>Download Setup<< (External Link)
>>Download license file until 26/09/2013<< (Mediafire Internal Link)
>>Download license faker until 2050<< (Mediafire Internal Link)
.
Step 2. Unplug the Internet Cable or Disconnect from the Internet. You should stay offline for this. Remove your previous copy of AVAST if you have any!
.
Step 3. Install the given setup of AVAST INTERNET SECURITY 8 in "Trial Mode" (DO NOT USE LICENSE YET!! otherwise avast! will detect two licenses and your IP will be closely monitored.) Now "Restart" the computer.
.
Step 4. After restarting, open the Avast Console by double clicking the Avast icon on your desktop. On the top right option click on "Settings". Go to "Troubleshooting" on the left pane displayed in a new dialog box.
.
Step 5. Deselect or Unmark "Enable avast! self-defense  module". Click on "OK". Then open the Avast folder at C:\Program Files\AVAST Software\Avast (your root drive may be different) and paste the file "ZeNiX.dll" after you rename it into "Version.dll". Keep "Version.dll" inside C:\Program Files\AVAST Software\Avast\Setup . Delete any "Userenv.dll" if you find any on those two folders.

Step 6.  Now run the registry file named "AVAST XP ZeNiX.reg". After the registry has been successfully added, run the program "Avast License ZeNiX 2012-06-29.exe". It is password protected. Password is "ZeNiX".
.
Step 6. Now open Avast Console again by double clicking icon at desktop. From the options given in the tab at the top, select "Maintenance". Then click on "Subscription" on the left pane selection. You will see a "10day" trial subscription. Now below that click "Insert Licence file". Now insert licence file "License.avastlic" and apply. Then you will get 13437days of amazing subscription!!


Step 7. Enable "avast! Self-Protection Module" and then restart. Now reconnect the internet connection. Be protected by software worth $49.5 for absolutely FREE!!
.
**Note : AVAST cost $49.5 (or nearly as much) for a SINGLE computer. This method can be used for multiple computers also which could cost hundreds of dollars!
.
Enjoy! and comment for review and feedback!


COMMENTS:

Read more ...